Setup guide · Settlement splitter

Connecting the Amazon API

Authorise Amazon's Selling Partner API once and the splitter pulls your settlements automatically — no downloading, and no race to save each file before Amazon drops it at 90 days. You'll create a private app on your own seller account and hand the splitter three values: a Client ID, a Client Secret and a Refresh Token. Here's every step, in order.

Prefer to keep it manual? Downloading Flat File V2 by hand is the alternative — no setup, one file at a time.

Before you start

What you need in front of you

To connect the API

  • Your Amazon Seller Central login — and you must be the account's Primary (admin) user
  • Apps and Services → Develop Apps in Seller Central
  • A few days' patience — Amazon's developer registration and role approval aren't always instant
  • The splitter's Amazon Connection page open in another tab, to paste the three values into
  • Somewhere safe for the Client Secret and Refresh Token while you set up
Do this before you buy. Amazon's developer sign-up and role approval can take a few days, and not every account is cleared straight away. Getting connected first is the surest proof the tool will work for you. Email us if you're unsure your account qualifies.
1

Register as an Amazon developer

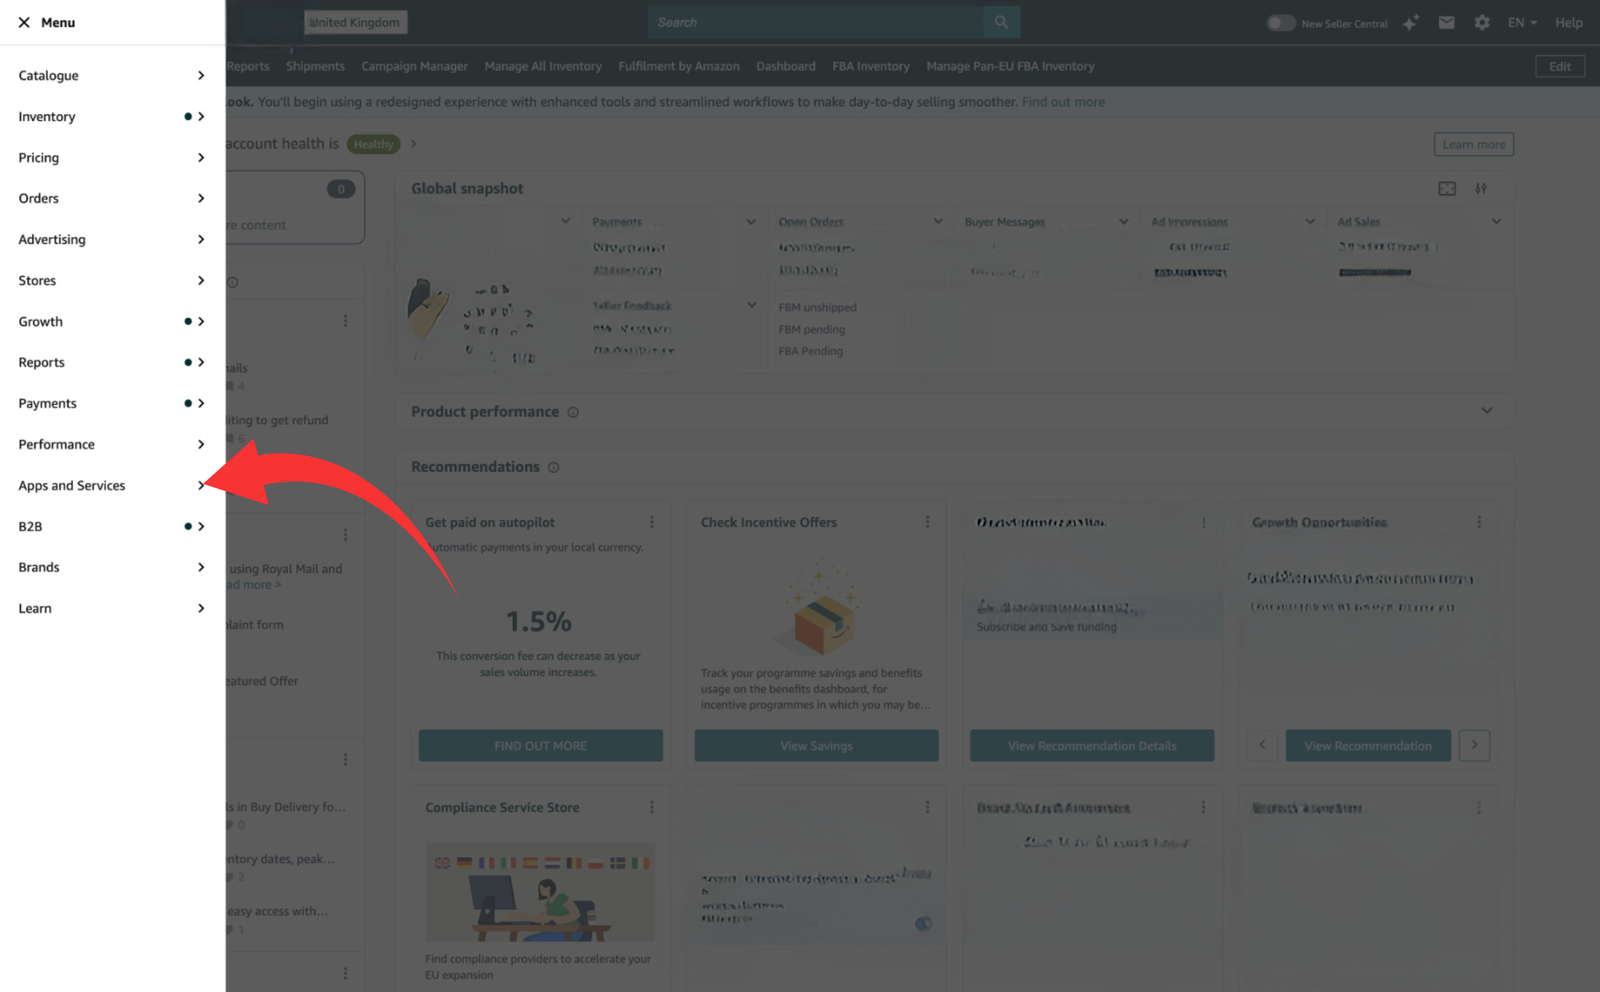
Log in to Seller Central as the account's Primary user, then open Apps and Services › Develop Apps. Accept the Selling Partner API terms and complete your developer profile — Amazon asks who you are and a short data-security questionnaire about how the data is used and stored. This one-off registration unlocks the Developer Console.
You must be the Primary user. Amazon only lets the account's primary (admin) user self-authorise an app. If you log in as a sub-user, the Authorize button in step 4 won't appear.
Amazon Seller Central menu with Apps and Services highlighted — Develop Apps lives here
Develop Apps lives under Apps and Services.
2

Create a private app & tick its roles

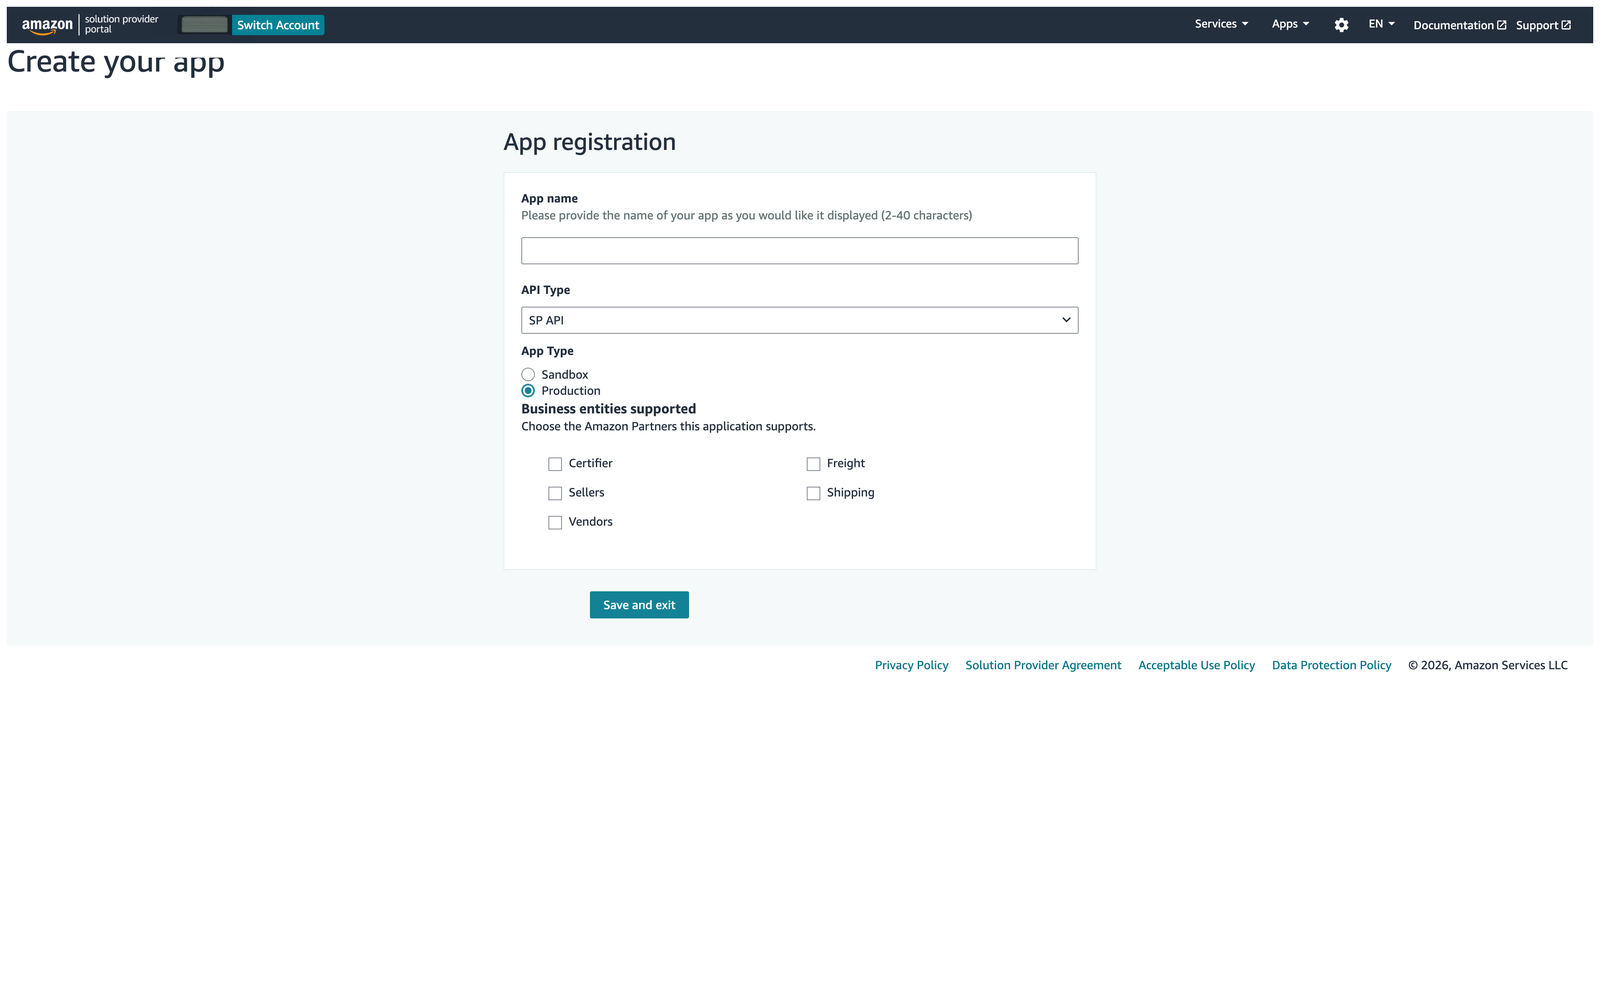
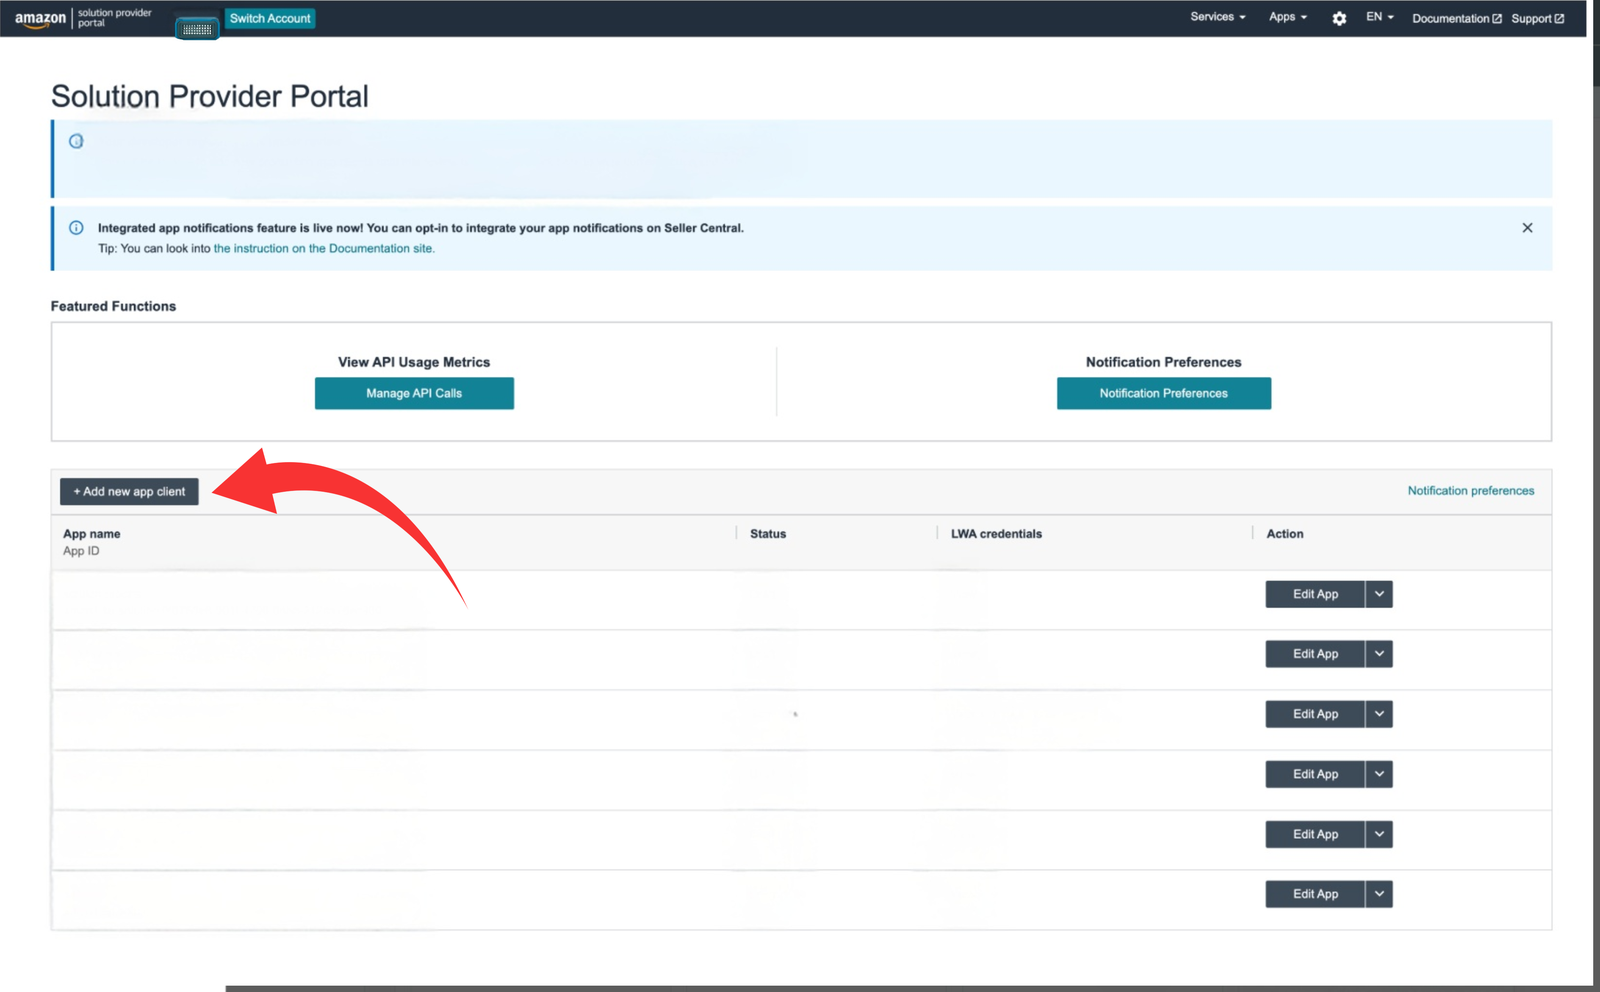
In the Developer Console, click Add new app client. Give it a name (anything — e.g. “sitelead splitter”), choose SP-API, and keep it private — a private app stays in draft and never needs publishing. Lower down the same form, tick the roles the product needs — the box below says exactly which.

Which roles to tick — they're all under Roles › Sellers on the registration form:
Settlement splitter — tick Finance and Accounting only. It just reads your settlement figures.
Temu Order Fetcher (sending orders to Amazon MCF) — tick Amazon Fulfillment only: “Ship to Amazon, and Amazon ships directly to customer”.
One app serving both products? Tick both. Asking for less is faster to approve and safer. The form's last question — will you delegate PII access to another developer's application (the Restricted Data Token)? — is answered No: these apps run on your own server and delegate nothing.
If Amazon flags the role for review, that's normal — some data roles are checked before they're switched on, which can take a few days. You can continue once it shows approved.
Amazon Developer Console (Solution Provider Portal) with the Add new app client button highlighted Amazon SP-API app registration form: app name, SP API type, Production
Add new app client, then register it — SP API, Production — and tick the roles your product needs (box below).
3

Copy your Client ID & Client Secret

On your app in the Developer Console, open View next to LWA credentials (“Login with Amazon”). Copy the Client ID (sometimes shown as the App ID) and the Client Secret — these are two of the three values the splitter needs.

Keep the Client Secret private. It's a password: anyone with it can act as your app. Don't email it or paste it into a chat — the splitter stores it in your own database or your own secret manager, never with us.
What you'll see: your app sits in the same list as the screenshot in step 2, and its LWA credentials column has a View link. Click it and two values appear: the Client ID — a long string starting amzn1.application-oa2-client. — and the Client Secret, hidden until you choose to show or copy it. Copy each one whole, with no spaces before or after. (No screenshot here on purpose — this panel shows live credentials.)
4

Authorise the app — your Refresh Token

Back on the app list, open the Edit app dropdown and choose Authorize app. Because it's your own account, Amazon authorises it immediately and shows a Refresh Token — a long-lived credential starting Atzr|. Copy it. That's the third and final value.

Copy it now. The full Refresh Token is shown once. If you lose it, just choose Authorize app again for a fresh one — your Client ID and Secret don't change.
What you'll see: in your app row's Action column (far right in the step 2 screenshot), click the small arrow beside Edit App to open its dropdown and choose Authorize app. Amazon asks you to confirm, then shows the Refresh Token — one long string starting Atzr| — with a copy control beside it. (No screenshot here on purpose — the token is a live credential.)
5

Paste the three values in and test

Open the splitter's Amazon Connection page, paste the Client ID, Client Secret and Refresh Token, choose your region (Europe for UK/EU sellers), save, and click Test connection. The test makes one small call and tells you in plain English whether everything's live — after that, settlements pull in on their own.

Screens moved? Amazon renames these pages from time to time. If a label here doesn't match what you see, email us a screenshot and we'll point you to the right spot — support is included.

If the test fails

Three usual suspects — and the fix for each

You're not the Primary user

Self-authorisation only works for the account's primary (admin) user. Sign in as that user and run step 4 again — the Authorize button will appear.

Role still pending

A permissions error usually means the role you requested — Finance and Accounting, or Amazon Fulfillment — isn't approved yet. Check the app shows the role as active, then re-issue the Refresh Token and test again.

Wrong or stale credentials

Re-copy the Client ID, Secret and Refresh Token letter-by-letter — a stray space is the most common cause. If the token was revoked, choose Authorize app for a fresh one.

Still stuck? Email ln3@sitelead.co.uk with a screenshot of the test result and we'll get you connected — support is included, and the guarantee covers Amazon changing its API.

FAQ

Common questions about connecting Amazon

Do I have to connect the API, or can I just download the file?

Either works. Connecting the API means settlements pull automatically and you never chase the 90-day deadline. If you'd rather not connect anything, download Flat File V2 by hand — same result, one file at a time.

Does it cost anything to use Amazon's API?

No — Amazon's Selling Partner API is free to use for your own account. You're only paying once for the splitter itself, never per settlement or per call.

Do I need to be the account owner?

Yes. Amazon only lets the Primary user of a Seller Central account self-authorise an app. If several people share the account, whoever is the primary user needs to do step 4.

Will sitelead ever see my keys or my data?

No. The app is created on your own seller account, and your Client ID, Secret and Refresh Token are stored in your own database or your own secret manager. They never pass through us.

The connection stopped working — what changed?

Usually the Refresh Token was revoked (for example, if someone removed the app's authorisation) or the Finance role was changed. Re-run step 4 for a new token, check the role is still active, and paste the new token in.

This connects the settlement splitter

Reconcile every Amazon payout to the penny — VAT-correct, ready for Xero — with the file pulled in for you automatically. Ask us about it.

Ask about the settlement splitter